switching over to wordpress!
rajandhisguzzi.wordpress.com
Wednesday, October 28, 2009

Monday, October 26, 2009
crank and bearings
The crank was pulled last, after the con rods were removed. There were a few nicks here and there, but I still don't know what its fate will be since I have yet to have it measured.

This is the section of the crank that mates with the rear carrier bearing. This seems like the most worn section.

and the rear carrier. Pretty worn if you ask me, a pretty good divot shown in this picture.

and the front carrier still attached to the block. You can see some worn grooves here too.

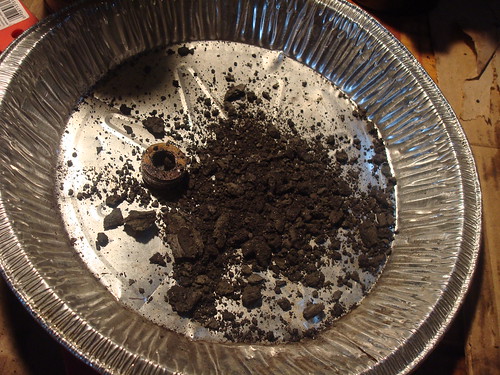
These old motors don't have oil filters, besides a crude centrifugal sludge trap located in the center of the crank, which traps sediment inside. I guess its better than nothing, but if this sludge accumulates too much there is a major risk of blocking the oilways and starving the con rod big end bearings.
Here is a picture of the sludge I found in my crank. Ghastly.

Most of it removed.

And now we're all caught up to date.

This is the section of the crank that mates with the rear carrier bearing. This seems like the most worn section.

and the rear carrier. Pretty worn if you ask me, a pretty good divot shown in this picture.

and the front carrier still attached to the block. You can see some worn grooves here too.

These old motors don't have oil filters, besides a crude centrifugal sludge trap located in the center of the crank, which traps sediment inside. I guess its better than nothing, but if this sludge accumulates too much there is a major risk of blocking the oilways and starving the con rod big end bearings.
Here is a picture of the sludge I found in my crank. Ghastly.

Most of it removed.
And now we're all caught up to date.
cam and cam followers
With the gears off, the cam thrust bearing and cam are an easy removal.
I was pretty surprised the cam doesn't run in a replaceable bearing, like the crank does.

The lobes are a little worse for wear.
Each lobe has the identical wear marks

By now I think it's pretty obvious the mileage indicated on the odometer when I received the bike wasn't very accurate, unless the PO was a POS. I could maybe possibly have this reground, but a fellow loopframer offered to sell me a B10 cam and resurfaced lifters.
About the B10 cam (from mgcycle.com)
"These cams provide a noticeable seat of the pants power boost at all rpms without straining the valve gear or other engine components. Among the best bang for the buck improvements. The B10 grind made it's debut in the "Powering Up Kit" offered for the early LeMans models, and was later used as original equipment in the LeMans 1000 series, as well as in a few 1000S and California III models."
The cam followers are removed from the large holes left and right of the 12 o'clock cylinder stud.

And here is a shot of my worse worn cam follower.

This is the face that rides the cam, the push rod is inserted into the other end.
I'm told ones nicer than this are thrown out and not even considered to be resurfaced, and that this one probably was oil starved, or a piece of debris (chrome!) was between the cam lobe and the follower's face.
inner timing cover
Back to the front.
With the inner timing cover off, I got my first view of the helical cut gears.

The front main seal (still attached to the cover on the bottom right) has been weeping for months, have been looking forward to fixing that leak for some time.
I found these crude drain holes a little offsetting, but I guess all they are doing is allowing the oil to drain faster back into the sump. I've been told not to pay them much mind.

With the gears off you can see the camshaft [top], crank shaft [middle] and the oil pump on the bottom, each driven by their own gear.

The oil pump is that small square on the bottom and its gear attached to the small bolt that protrudes out. This was the only gear that required the use of a puller - I wished I thought to examine my puller before I went at it. My puller in particular [a harbor freight model] uses a hollow main bolt, which I really never noticed before. When I placed it over the oil pump bolt, it slipped down over it and buggered the leading thread. I subsequently put a large washer between the puller and the bolt to get the gear off. I think the pump bolt is repairable, well I really hope it is because a replacement pump is over $300.

I'm hoping I can just run a die over it.
With the inner timing cover off, I got my first view of the helical cut gears.

The front main seal (still attached to the cover on the bottom right) has been weeping for months, have been looking forward to fixing that leak for some time.
I found these crude drain holes a little offsetting, but I guess all they are doing is allowing the oil to drain faster back into the sump. I've been told not to pay them much mind.

With the gears off you can see the camshaft [top], crank shaft [middle] and the oil pump on the bottom, each driven by their own gear.

The oil pump is that small square on the bottom and its gear attached to the small bolt that protrudes out. This was the only gear that required the use of a puller - I wished I thought to examine my puller before I went at it. My puller in particular [a harbor freight model] uses a hollow main bolt, which I really never noticed before. When I placed it over the oil pump bolt, it slipped down over it and buggered the leading thread. I subsequently put a large washer between the puller and the bolt to get the gear off. I think the pump bolt is repairable, well I really hope it is because a replacement pump is over $300.
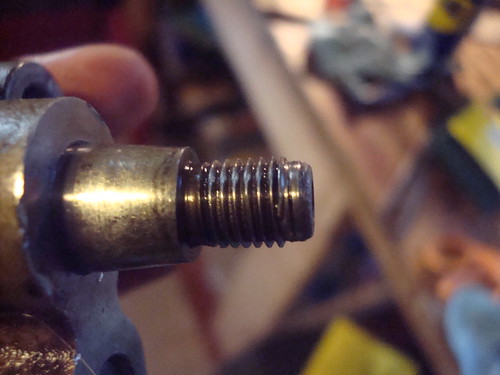
I'm hoping I can just run a die over it.
ring gear, clutch and flywheel
My ring gear had suffered some wear due to a faulty starter solenoid, which was providing a short throw to my starter's bendix. This resulted in poor starter engagement, and a ton of terrible grinding noise. All of the teeth on my ring gear (gear which the starter grabs to turn the motor over) where chewed down 1/8" by the starter.

One of the first fixes I did back in 2007 was to replace the solenoid with a new and correct one from MG cycle. Instant fix too, perfect engagement every time. Although the damage to my ring gear had already been done, the engagement has not suffered since, and I'll just reuse the ring gear when the motor gets put back together.
The ring gear and clutch came off next.

What's funny about this picture is that I thought I had the clutch pack completely out of the mill. Still secured in the flywheel was the pressure plate and springs, which one would think would want to pop itself free due to the spring force pushing it out. However, the amount of friction material in the splines of the flywheel bound the plate in place and prohibited complete movement. It actually took me to clean the friction material out of the splines with a flat head and some judicial prying to free the plate. And now I no longer wonder why my clutch wouldn't properly disengage all the time.
Some may measure out their plates and decide to reuse them or not. Personally I'm just going to replace them as I'm a firm believer of "while you are in there."
Here is the pressure plate removed. Only the flywheel remains.

And with the flywheel removed.

This is supposed to be a dry cavity and any oil you see is either from the rear main seal or the cam shaft plug seal. I'll replace the main seal and seal the cam plug with JB weld.

One of the first fixes I did back in 2007 was to replace the solenoid with a new and correct one from MG cycle. Instant fix too, perfect engagement every time. Although the damage to my ring gear had already been done, the engagement has not suffered since, and I'll just reuse the ring gear when the motor gets put back together.
The ring gear and clutch came off next.

What's funny about this picture is that I thought I had the clutch pack completely out of the mill. Still secured in the flywheel was the pressure plate and springs, which one would think would want to pop itself free due to the spring force pushing it out. However, the amount of friction material in the splines of the flywheel bound the plate in place and prohibited complete movement. It actually took me to clean the friction material out of the splines with a flat head and some judicial prying to free the plate. And now I no longer wonder why my clutch wouldn't properly disengage all the time.
Some may measure out their plates and decide to reuse them or not. Personally I'm just going to replace them as I'm a firm believer of "while you are in there."
Here is the pressure plate removed. Only the flywheel remains.
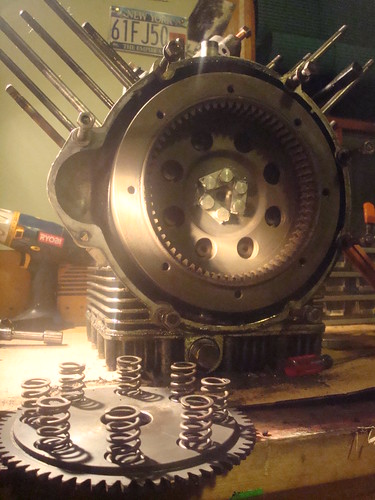
And with the flywheel removed.

This is supposed to be a dry cavity and any oil you see is either from the rear main seal or the cam shaft plug seal. I'll replace the main seal and seal the cam plug with JB weld.
pistons and cylinders
With the juggs and pistons off......

You can see some scoring on this piston to the right of the wrist pin. This is the left side of the engine, the side with the noticeable 'clank'.

I believe this to be caused by chrome flakes, but cannot say for sure. I have already purchased a new set of Gilardoni cylinders and pistons from MG cycle, so I wasn't too concerned with the condition of my old ones.
And one more point of interest is my small end bushings - particularly on the right side, which fell out under its own weight! Here you can see it inching its way out of the con rod. These are supposed to be a tight interference fit, so yeah - this is another bad sign.

rocker wear.
When I first brought my bike home, the first thing I did was pull the heads to check and see what was going on with my cylinders. I don't think you can own or be in the market for a guzzi of this era and not know of the potential damage failing chrome liners can do.
I found out quickly enough that I had iron sleeved liners, and was happy enough to leave it at that. I put the heads back on and put a few thousand miles on the bike the next 2 years. I change my oil probably more than some would think necessary (at or before every 1,200 miles) and I've dropped the pan for a cleaning twice. Still, the remnants of those cursed chrome liners are found in every little crevice of my block. Here you can see a tiny flake blocking the oil passage way in my rocker spindle.

Surprisingly, it did not fail. Though I'm still not sure if I am going to ruse the part.
One more subject of discussion in the cylinder head area is the wear on the rocker arm where it makes contact with the valve stem. It's probably best to show the picture first so we are on the same page.

Now you can see where the valve stem makes contact with the rocker and created this little divot. While still structurally sound, the problem is that this induces an incorrect measurement when using a feeler gauge to set the valves. The feeler gauge will measure between the high spot on the rocker and the valve stem and will be loose to the degree of that divot. Considering these clearances are to a hundredth of a millimeter, I'm going to sand or hone these down to remove this depression.
Subscribe to:
Posts (Atom)